
Using the Open Policy Agent CLI
Learn how to use Open Policy Agent Command Line Interface

Getting Started with Envoy & Open Policy Agent — 04 —
Using the Open Policy Agent Command Line Interface
This is the 4th Envoy & Open Policy Agent Getting Started Guide. Each guide is intended to explore a single feature and walk through a simple implementation. Each guide builds on the concepts explored in the previous guide with the end goal of building a very powerful authorization service by the end of the series.
The source code for this getting started example is located on Github. ——> Envoy & OPA GS # 4
Here is a list of the Getting Started Guides that are currently available.
Getting Started Guides
- Using Envoy as a Front Proxy
- Adding Observability Tools
- Plugging Open Policy Agent into Envoy
- Using the Open Policy Agent CLI
- JWS Token Validation with OPA
- JWS Token Validation with Envoy
- Putting It All Together with Composite Authorization
- Configuring Envoy Logs Taps and Traces
- Sign / Verify HTTP Requests
Installing Open Policy Agent Locally
Intalling Open Policy Agent (OPA) is pretty simple. It is a very small executable and is entirely self contained with no other files required. Depending on your operating system, the command to install OPA is slightly different:
- Download the executable:
- Mac OSX:
curl -L -o opa https://openpolicyagent.org/downloads/latest/opa_darwin_amd64 - Linux :
curl -L -o opa https://openpolicyagent.org/downloads/latest/opa_linux_amd64
- Give OPA permission to execute
chmod 755 ./opa - Move OPA somewhere in your path
mv opa /somewhere/in/path
Using the CLI
The Open Policy Agent command line interface is used for one of 3 different purposes:
- Using the OPA in interactive mode to write and evaluate REGO statements with realtime feedback after each statement
- Running policies by supplying a file for the input and another file with the policy to execute
- Starting OPA as a service to use it’s API for decisioning
Read Evaluate Print Loop (REPL) & Interactive Playground
Interactive mode is sometimes referred to as a read-evaluate-print-loop (REPL). OPA will wait and read in input from a user. It will then evaluate the input and print the results of the evaluation for the user to see. It then loops through these steps over again until one of the statements that needs to be evaluated is the exit statement.
- To start using the OPA interactively simply enter the command
opa run - When you are ready to leave just enter the command
exit
The Open Policy Agent web site has a nice tutorial for getting started with the REPL and interactively writing REGO policies. So, we won’t repeat that here. It is located at https://www.openpolicyagent.org/docs/latest/. The latest version of the getting started is an interactive notebook. So, you can edit the commands right on the web page and see the results.

There is also an interactive playground located at https://play.openpolicyagent.org/ It can be used to accomplish the same thing that we will demonstrate below. However, you probably don’t want to use these tools when you are writing your own policies. The logic of your policies may be confidential and proprietary and the data used in the policies may be confidential as well.

Using the CLI to evaluate a policy with some test data
The Rego Policy
For this getting started example we will use the same policy that we created for Getting Started #3. It simply checks the request method and allows the request through if the Method is a GET operation.
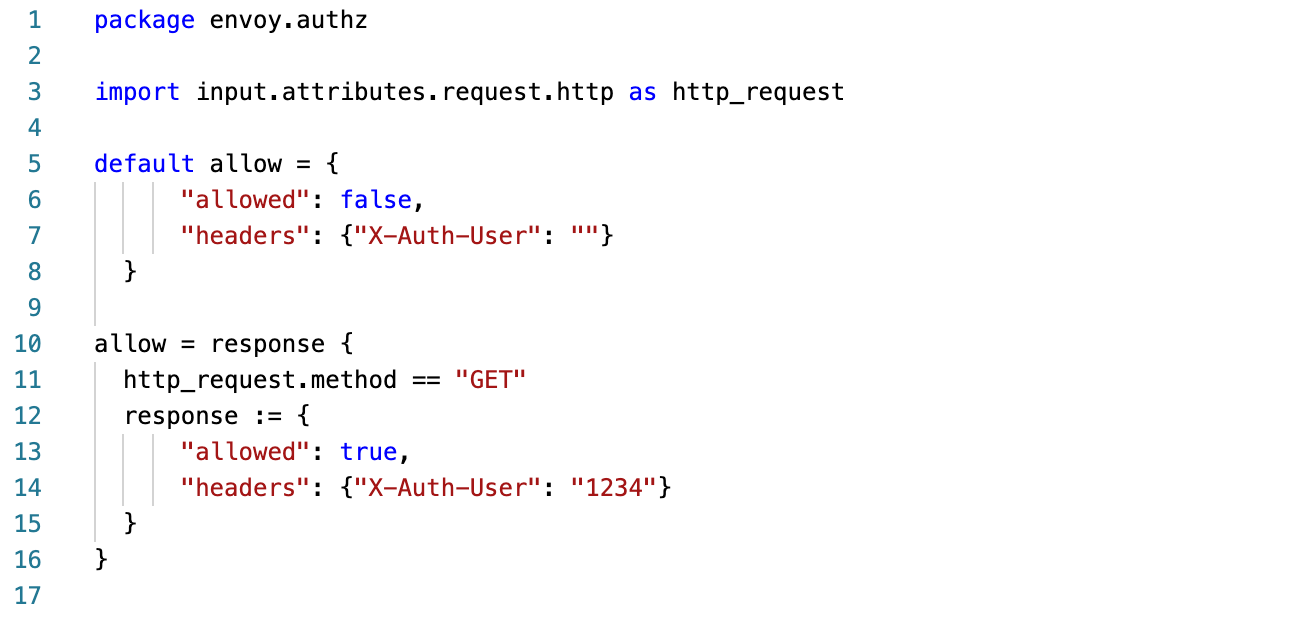
An Allowed Input
We will also need to simulate an input that we expect will be allowed through. We are using the same data structure that Envoy sends us. Since we are only looking at the request Method, line 38 is only property that we are concerned about.

Run the command
To run the policy with the input that we just covered, we use the eval subcommand as part of the OPA cli. We then need to pass in a few parameters:
- -i specifies the name of the file that we want to use as input
- -d specifies the name of the file contains the REGO policy that we want to run
- The last parameter is the query that we want to run. This was implied for us in the previous lesson since it a default is already baked into the containers that we used. In the command line below, we see that the query is data.envoy.authz.allow
opa eval -i ./data/allowed_input.json -d ./policies/policy.rego 'data.envoy.authz.allow'`The supplied bash script can save you some typing and will also run both the allowed example and the denied example.
-
This script saves you from having to install OPA locally. It runs OPA in docker.
./demonstrate_opa_cli_in_docker.sh -
This script runs OPA locally.
./demonstrate_local_opa_cli.sh
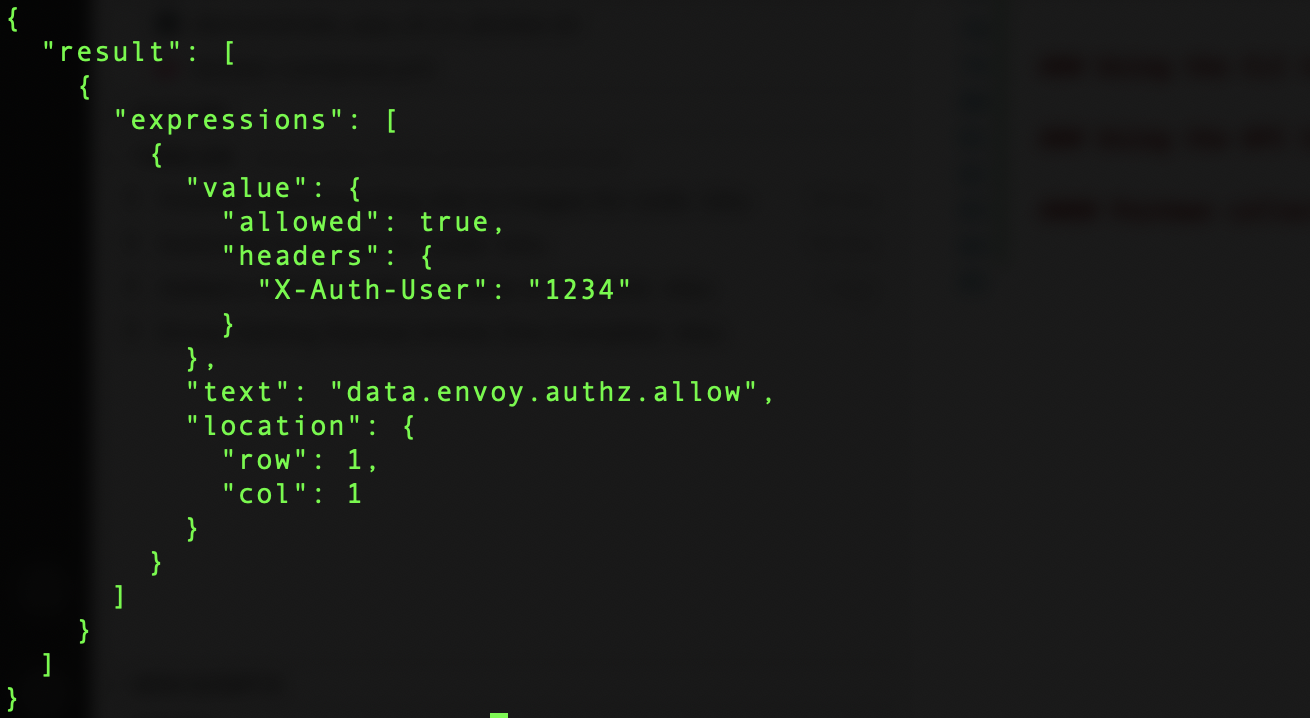
The results
After the command runs, you should see something like the image below. OPA returns a JSON Document with a results object and an array of processing results for expressions.
Using the CLI to execute REGO Tests
Thankfully Open Policy Agent has a built in unit testing capability. It is really easy to use and will give you confidence when you are managing a large set of rules and periodically make changes to them. Just name your test file the same name as your policy with _test added to the base filename. Test are written in Rego just like the policies. We need to specify the same package name package envoy.authz as the policy that we are testing. Each test is actually a rego rule. The rego rule name must begin with the word test. The rest of the name should be descriptive of the test and expected result. e.g. test_get_allowed
The body of the rule is of the form:
rule to run in the policy under testwith input assimulated test input
Here is the test file that we have written to test our policy:

As you can see we simply drop in Envoy’s JSON input that we are testing and the result we expect (either allowed or not allowed). The highlighted property in each test data set shows the only value that we are looking for in our rules:
- The
allowedtest case has a GET method in the test data - The
not allowedtest case has a POST which falls into the the set of
all methods other than GET are not allowed
Using the API Interactively to Develop Policies
OPA policy agent also supports running as a service and accessing it via REST APIs. Detailed API information can be found on the Open Policy Agent web site. Here is a summary of the APIs.
Policy API for Creating, Updating or Deleting Policies
* GET /v1/policies #--- List Policies
* GET /v1/policies/<id> #--- Get a specific Policy
* PUT /v1/policies/<id> #--- Create or Update a Policy
* DELETE /v1/policies/<id> #--- Delete a policy
Data API for Creating, Updating or Deleting Data and Getting Decisions
* GET    /v1/data/{path:.+} #---  Get a Document
* POST   /v1/data/{path:.+} #---  Get a Document (with Input e.g. get a decision). The input document `{ "input": ... }` is passed in the request body
* PUT    /v1/data/{path:.+} #---  Create or Overwrite a Document
* PATCH  /v1/data/{path:.+} #---  Patch a Document
* DELETE /v1/data/{path:.+} #---  Delete a Document
Tips when using the API
- It is important to understand how the OPA document model works. The document model is described on the Open Policy Agent web site.
- Attempting to delete everything by supplying the root path for the policy or data endpoint doesn’t delete everything. This makes sense after thinking about it. It would be very easy to accidentally clear out an entire OPA engine and un-intentionally cause an outage if that was done in production.
- Even though all of the policies are visiable in the data endpoint when queried, they can’t be created, deleted or modified using that endpoint. It is mearly a way of invoking the policy and getting a decision. (see the policy in the highlighted section below)

- Even though data and policies can be loaded in the same data document tree, it is confusing and not recommended (e.g. I deleted that data why is it still there? Oh, that’s because it is a policy and can’t be deleted by the data API):
/v1/data/{packagename}/{data document name}/v1/data/{packagename}/{policy rule name}
- A clearer approach is to have a reference data and policy path like this:
/v1/data/reference/{data document path and name}/v1/data/app/{packagename}/{policy rule name}
- The Policy API will store a policy with any provided key. However, it is loaded into the global data document based on its package name. Using the package name as the policy ID is an intuitive way to refer to policies. The policy ID field supports forward slashes.
- Be careful When assigning calculated or lookup values to a variable that you want to return in the result set. OPA will not return an undefined value in a property of a JSON document. An undefined value will fail the entire rule and cause OPA to return an empty object if no statically defined default is specified.
Producing Reason Codes with REGO
Sometimes it is desirable for debugging or for audit or regulatory purposes to capture a reason code for decision results (usually denial reason but sometime approval too ). The OPA playground has a pet shop app example. It can be found in the REGO playground. Just select the attribute based access control example from the drop down menu.
The example below is modified to provide approval reasons and other messages in the case of a denial to help understand why access was denied. Logical OR conditions are expressed by creating multiple rules with the same name. The first 4 allow rules below are various reasons to approve the access request. If any of these rules is true the response is set to a static object with the approval decision and the reason code. The 5th allow rule is intended fire only when all of the approval rules fail. It is intended to give us insight into why the access request was denied. So this rule tests to see if all of the other rules fail.

To make sure the approval rules and deny rule don’t get out of sync, they both point to named approval rules below.

The messaging section is similar to the logical OR approval rules above. However they are structured a little bit differently. The square brackets enable these rules to return an array / collection of results. Unlike other data types where an undefined value will cause the rule to fail, it will return an empty array if none of the rules triggers the population of a message.

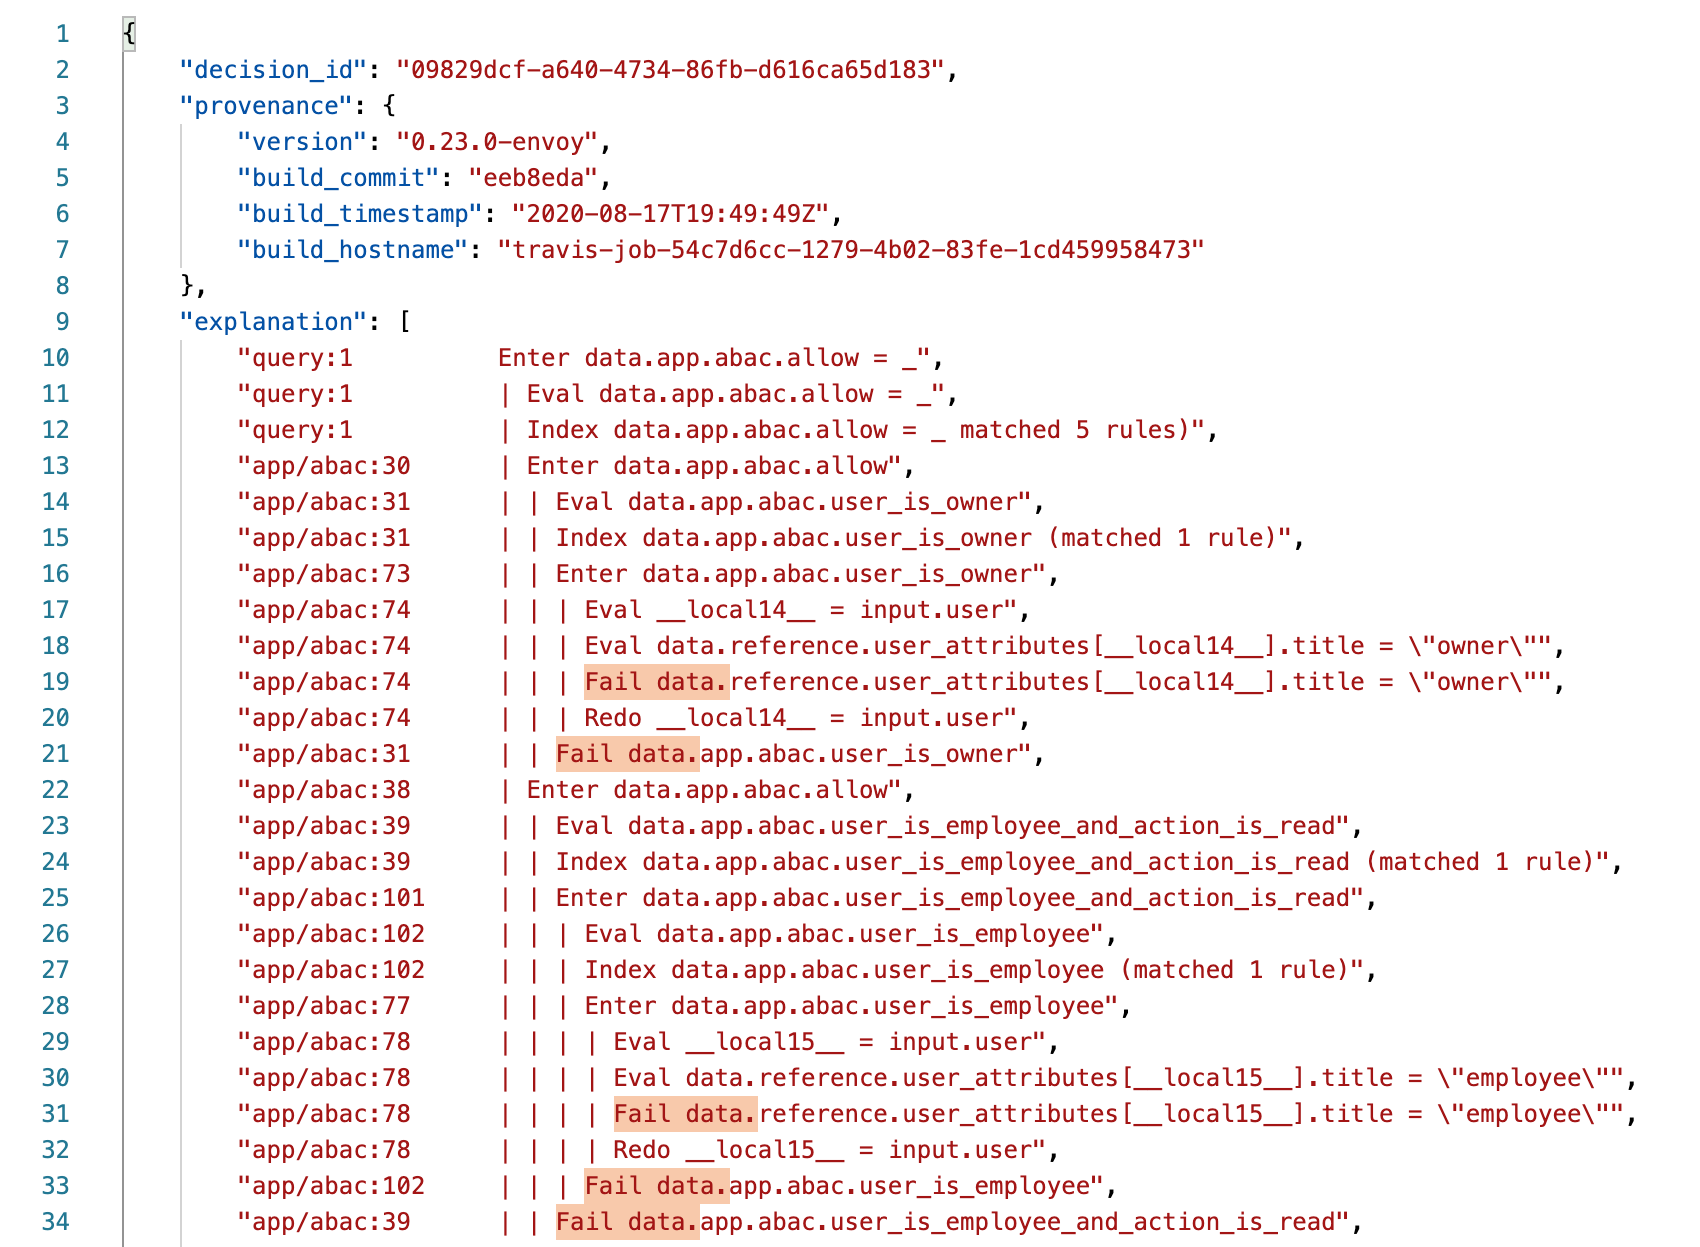
With these changes we now have insight into the output of the rules. In the example below, we send in a request with an un-registered user. If more insight is needed there is also the option to add the explain = full parameter to see a trace of the rule execution. The response field shows the results with provenance, explanation, metrics, and the messages that indicate which rules failed.

The images below zoom in on the explaination returned. The highlighted sections shows the step by step rule execution and where the rule failures occurred. On the left hand side is a reference to the exact line number in the rego file where the rule failure occurred. Any rule that results in an ‘undefined’ state is considered a failure.
Exploring the OPA API with a sample Postman collection
To make it easier to explore the OPA APIs, a postman collection pre-populated with the example data and policy is included with the rest of the code in the github repository.
Uploading the Pet Store App ABAC Policy via Postman

Uploading the Pet Store App Reference Data

Exploring the OPA API with a sample bash script
If you don’t already use Postman, another option to explore the OPA APIs that does not require a large install is to use the included bash script. Simply run demonstrate_opa_api_in_docker.sh

Congratulations!
We have walked through how to use the OPA CLI, test REGO policies and use the OPA REST API. With the basics under your belt, we can move on to more sophisticated use cases such as Signed JSON Web Token (JWS) validation.