
Using Envoy as a Front Proxy
Learn how to set up Envoy as a front proxy with docker

Photo by Mattia Serrani on Unsplash
Getting Started with Envoy & Open Policy Agent — 01 —
Using Envoy as a Front Proxy
This is the 1st Envoy & Open Policy Agent (OPA) Getting Started Guide. Each guide is intended to explore a single Envoy or OPA feature and walk through a simple implementation. Each guide builds on the concepts explored in the previous guide with the end goal of building a very powerful authorization service by the end of the series.
The source code for this getting started example is located on Github. ——> Envoy & OPA GS # 1
Here is a list of the Getting Started Guides that are currently available.
Getting Started Guides
- Using Envoy as a Front Proxy
- Adding Observability Tools
- Plugging Open Policy Agent into Envoy
- Using the Open Policy Agent CLI
- JWS Token Validation with OPA
- JWS Token Validation with Envoy
- Putting It All Together with Composite Authorization
- Configuring Envoy Logs Taps and Traces
- Sign / Verify HTTP Requests
Overview
Envoy is an open source edge and service proxy that has become extremely popular as the backbone underneath most of the leading service mesh products (both open source and commercial). This article is intended to demystify it a bit and help people understand how to use it on it’s own in a minimalist fashion.
Envoy is just like any other proxy. It receives requests and forwards them to services that are located behind it. The 2 ways to deploy Envoy are:
-
Front Proxy - In a front proxy deployment Envoy is very similar to NGINX, HAProxy, or an Apache web server. The Envoy server has it’s own IP address and is a separate server on the network from the services that it protects. Traffic comes in and get forwarded to a number of different services that are located behind it. Envoy supports a variety of methods for making routing decisions.
- One mechanism is to use path based routing to determine the service of interest. For instance a request coming in as:
/service1/some/other/stuffcan use the first uri path element as a routing key.service1can be used to route requests to service 1. Additionally,service2in/service2/my/applications/pathcan be used to route the request to a set of servers that support service 2. The path can be rewritten as it goes through Envoy to trim off the service routing prefix. - Another mechanism is to use Server Name Indication (SNI) which is a TLS extension to determine where to forward a request. Using this technique,
service1.com/some/other/stuffwould use the server name to route to theservice1services. Additionally,service2.com/my/applications/pathwould use service2.com to route the request toservice2.
The diagram above shows the front proxy approach.
- One mechanism is to use path based routing to determine the service of interest. For instance a request coming in as:
-
Sidecar Proxy - In a sidecar deployment, the Envoy server is located at the same IP address as each service that it protects. The Envoy server when deployed as as sidecar only has a single service instance behind it. The sidecar approach can intercept all inbound traffic and optionally all outbound traffic on behalf of the service instance. IP Tables rules are typically used to configure the operating system to capture and redirect this traffic to Envoy.

The diagram above shows the sidecar approach.
In this article and example project we will start with the simplest possible Envoy deployment. This example just uses docker compose to show how to get Envoy up and running. There will be a number of subsequent articles that expand on this simple approach to demostrate more Envoy capabilies. Open Policy Agent will also be introduced to handle more complex authorization use cases that cannot be handled by Envoy alone.
The diagram below shows the environment that we are about to build and deploy locally.

Building an Envoy Front Proxy
The code for the complete working example can be found on Github. We will start with the Envoy docker images. The Envoy images are located on Dockerhub. We will use docker-compose to build some configurability into our Envoy environment.
Dockerfile
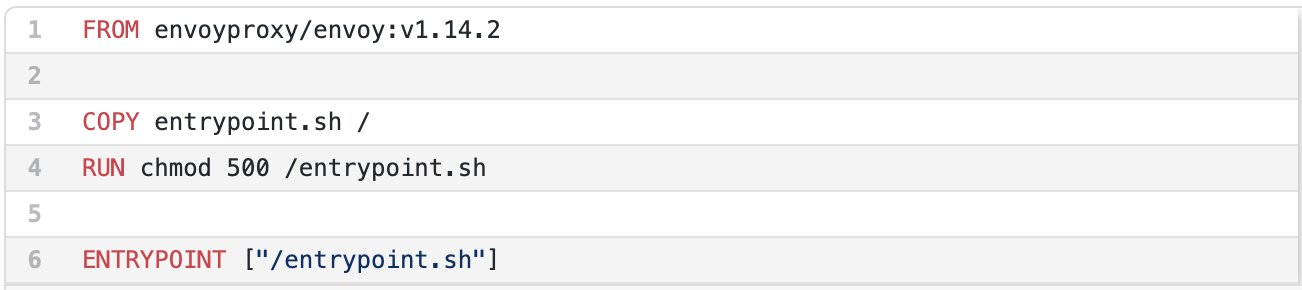
The entrypoint.sh file is where the magic happens. We will configure environment variables in our docker-compose file to determine which service (SERVICE_NAME) Envoy routes to and the port (SERVICE_PORT) on that service. Additionally, we specify how much detail is captured in the logs by setting the DEBUG_LEVEL environment variable. As you can see from the script below on line 3, we replace those environment variables on the fly in Envoy’s configuration file before starting Envoy.
entrypoint.sh

Since we don’t have a configuration file yet, we will cover that next. Envoy is very flexible and powerful. There is an enormous amount of expressiveness that the Envoy API and configuration files support. With this flexibility and power, Envoy configuration files can become quite complicated with a lot layers in the YAML hierarchy. Additionally, each feature has a lot of configuration parameters. The documentation can only cover so much of that functionality with an open source community of volunteers.
One of the challenges that I have when reading through the documentation and trying to apply it, is that the documentation has a variety of YAML snippets. There are very few places that these YAML snippets are pulled together into a functioning example. There are a few examples in the source code examples directory but they are far from comprehensive. That leaves a lot of tinkering for engineers to figure out how to compose a functional configuration while interpretting sometimes unclear error messages on their way to the promised land. That is the entire reason that I am writting a series of getting started guides. These articles are intended to give folks a known to work starting point for Envoy authorization features and extensions like Open Policy Agent.
The Envoy configuration starts with defining a listener as we can see starting on line 3. The first property is the address and port to accept traffic on (lines 3 through 6). The next property is a filter chain. Filter chains are very powerful and enable configuration for a wide variety of possible behaviors. This filter chain is as simple as it gets. It simply accepts any HTTP traffic with any URI pattern and routes it to the cluster named service.
The http_connection_manager component does this for us. It’s configuration starts on line 9 and extends to line 24. Execution order is determined by the order they are listed in the configuration file. The important part for this discussion begins on line 14 with the route_config. This sets up routing requests for any domain (line 18) and any request URI that begins with a slash (line 20) to go to the cluster named service. The cluster definitions are in a separate section to make them reusable destination across a variety of rules.
Envoy Configuration (envoy.yaml)
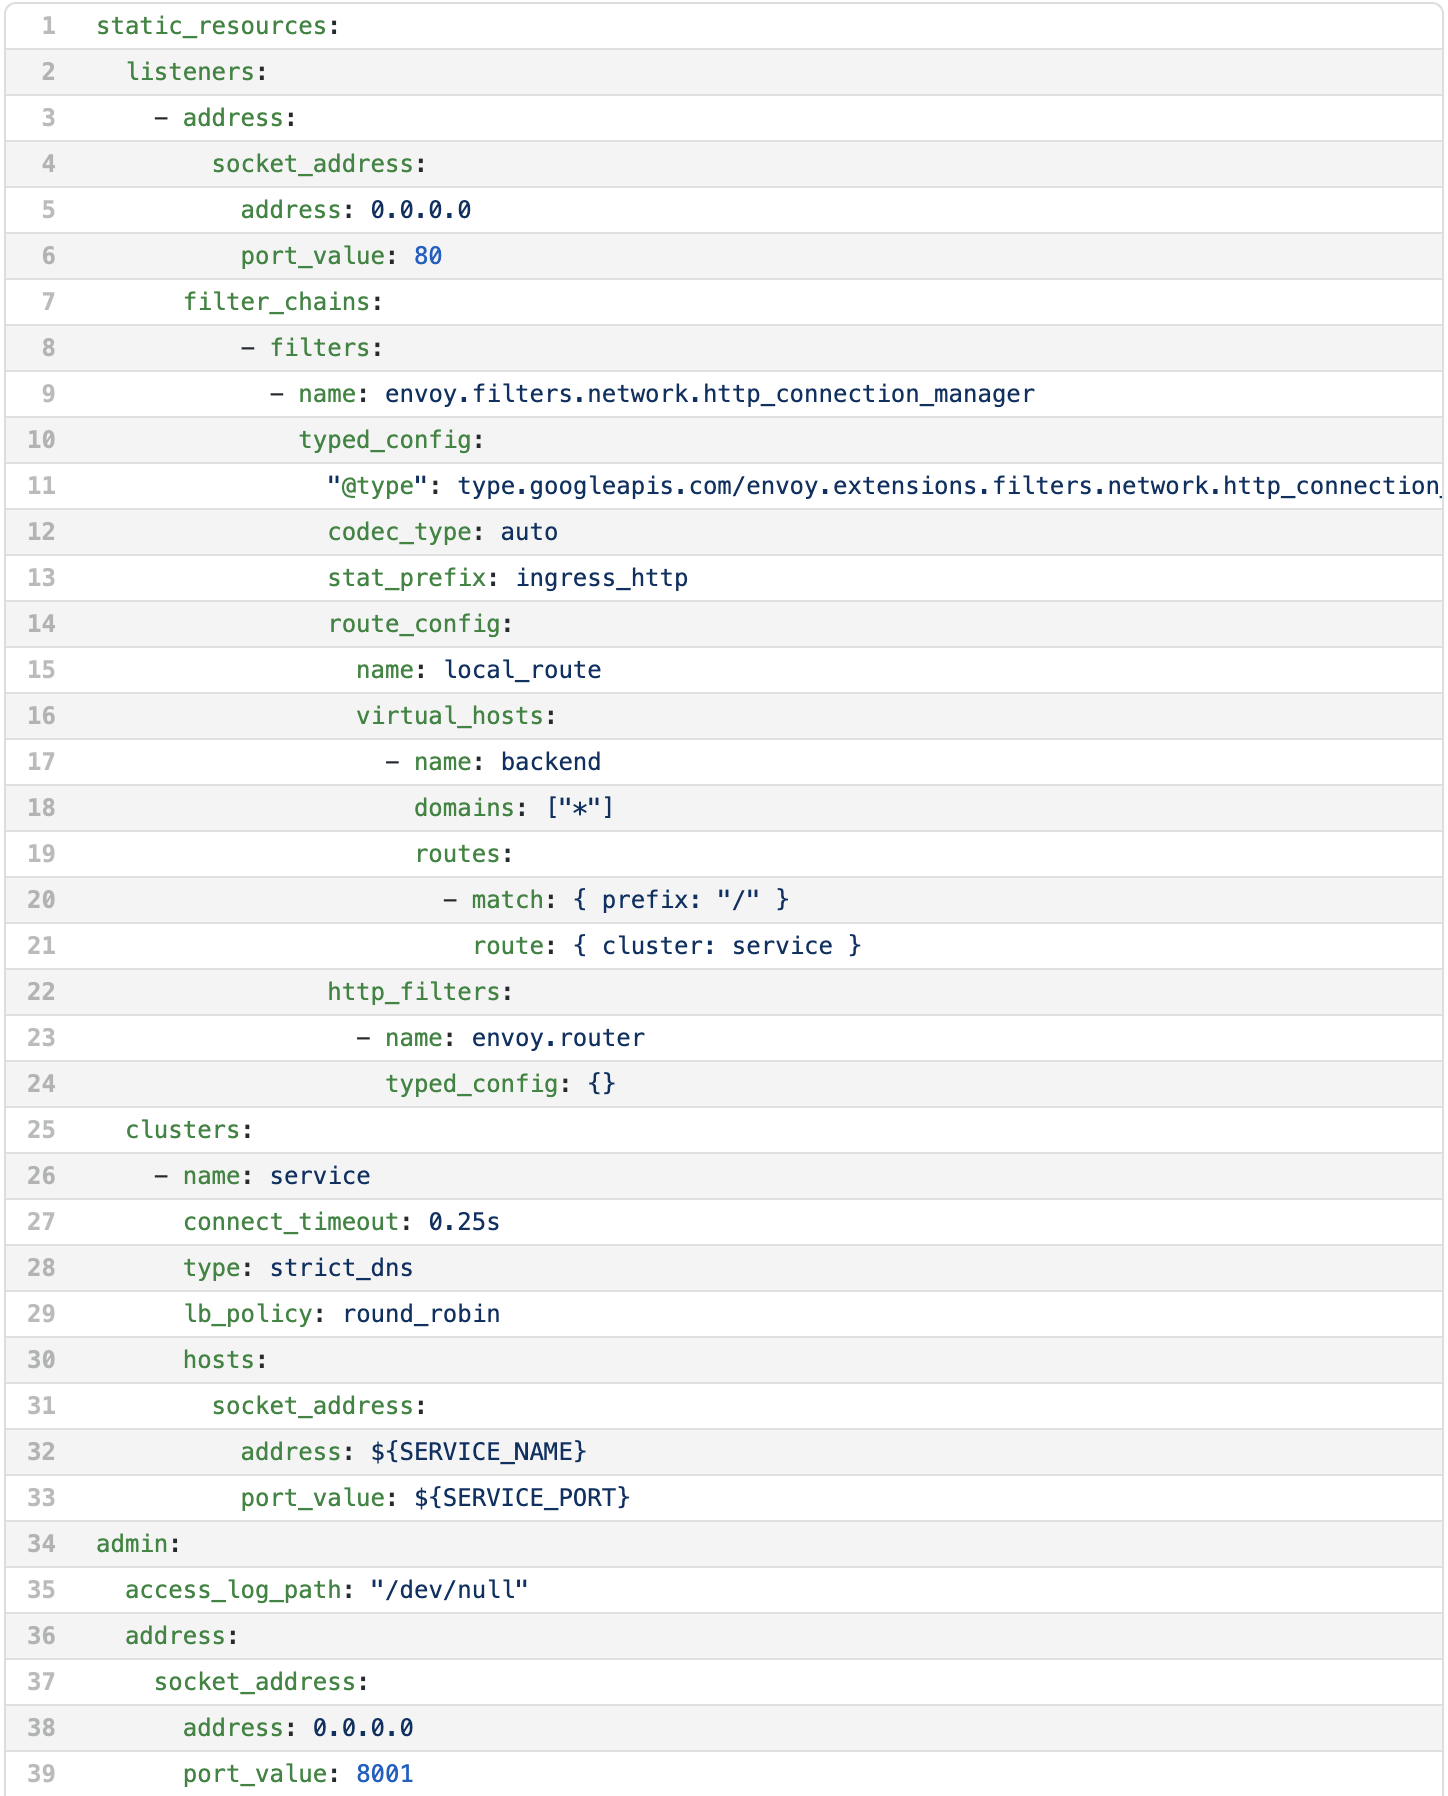
The cluster definitions begin on line 25. We can see that there is only a single cluster defined. It has the name service, uses DNS to find server instances and uses round robin to direct traffic across multiple instances. The hostname is on line 32 and the port is on line 33. As we can see these are the environment variables that we will swap out with the entry.sh script.
The last section of the configuration file tells Envoy where to listen for admin traffic. The admin gui is a handy little tool that we will not cover in this guide but is definitely worth poking around in to observe what is going on inside an individual Envoy instance.
Docker Compose Configuration
Now that we understand the Envoy configuration we can move on to understanding the rest of the simple environment that we are setting up. Line 4 shows the trigger that causes docker to build the Envoy container. Docker will only build the Envoy Dockerfile the first time it sees that an image does not exist. If you want to force rebuilding the Envoy container on subsequent runs add the --build parameter to your docker compose command. We expose Envoy to the host network on lines 6 and 7 and provide the configuration file that we just created on line 9.

The service to route to and port are defined on the environment variables on lines 12 and 13. Notice the name app matches the name of our final service on line 15. We are simply using HTTPBIN to reflect our request back to us.
Running and Trying out our Example
The last step to getting our front proxy up is simply running the included script test.sh that demonstrates our example. The script explains what it is about to do to ensure you know what are about to see scrolling across your terminal screen. Line 3 starts our environment. Line 8 let’s you check to make sure both containers are running before trying to send them a request.
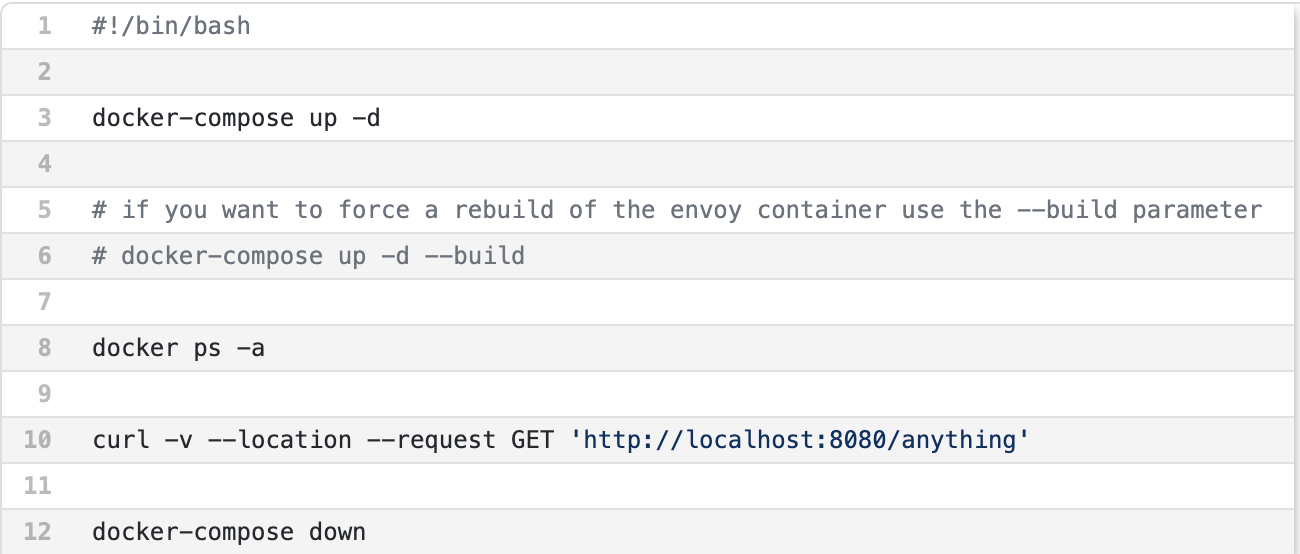
Line 10 simply calls Envoy with a curl command with the --verbose parameter set so that you can see the headers and request details. Then line 12 tears down the whole environment.
Containers UP!!!!
If you have successfully started your environment then you should see something like this:

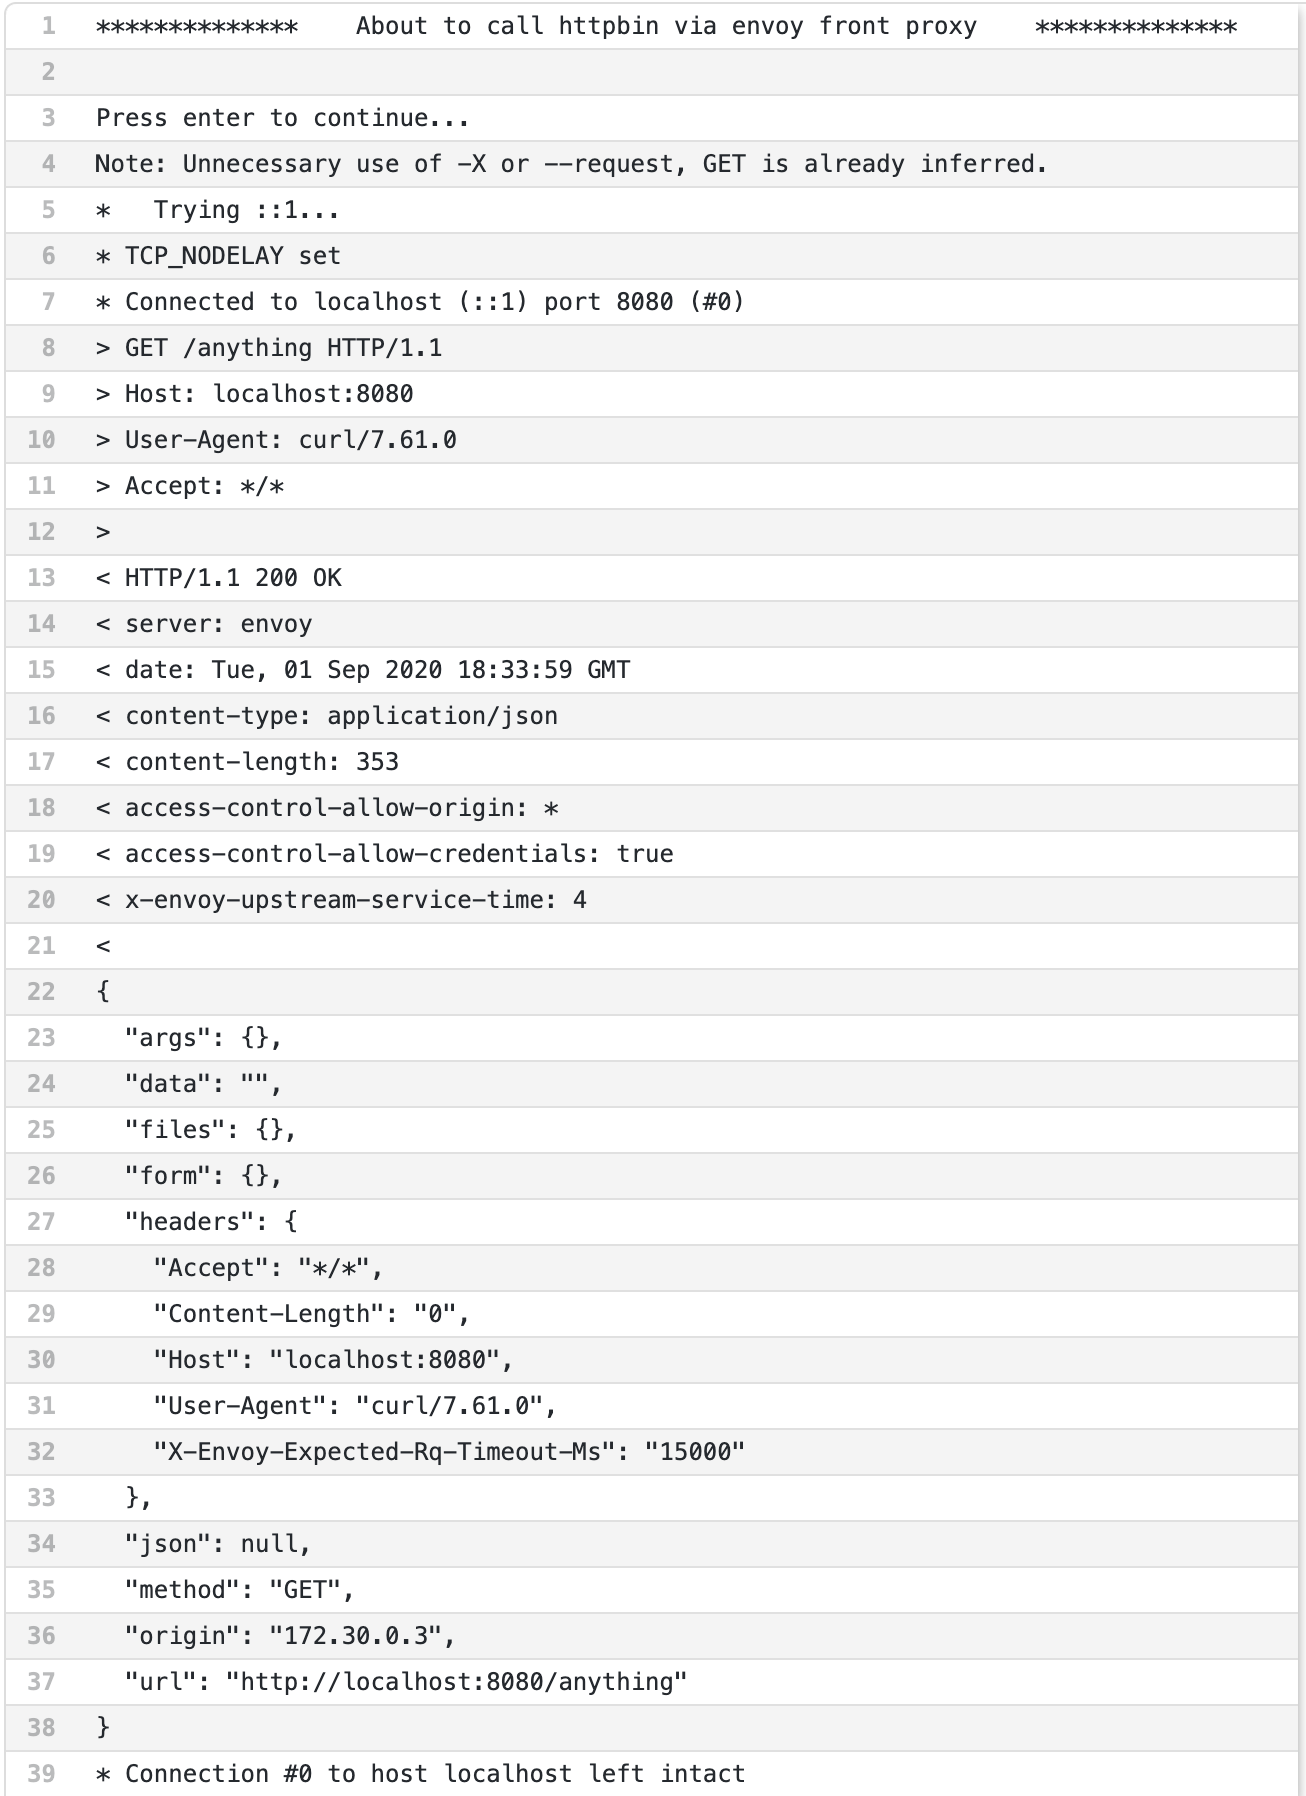
We Succeeded!!!
You should see something like this if you successfully called HTTPBin through Envoy:
Congratulations
Congratulations, you have successfully stood up your first Envoy instance and configured it to forward traffic! This is the simplest possible Envoy configuration :) We don’t have any security yet or any other features that Envoy is famous for. We will get to that in future articles. Feel free to use postman to explore other requests that you can send. Additionally, don’t forget to explore Envoy’s admin console by pointing your web browser to http://localhost:8001