Plugging Open Policy Agent into Envoy
Learn how to use Open Policy Agent with Envoy for more powerful authorization rules

Photo by Kutan Ural on Unsplash
Getting Started with Envoy & Open Policy Agent — 03 —
Plugging OPA into Envoy
This is the 3rd Envoy & Open Policy Agent Getting Started Guide. Each guide is intended to explore a single feature and walk through a simple implementation. Each guide builds on the concepts explored in the previous guide with the end goal of building a very powerful authorization service by the end of the series.
All of the source code for this getting started example is located on github. ——> Envoy & OPA GS # 3
Here is a list of the Getting Started Guides that are currently available.
Getting Started Guides
- Using Envoy as a Front Proxy
- Adding Observability Tools
- Plugging Open Policy Agent into Envoy
- Using the Open Policy Agent CLI
- JWS Token Validation with OPA
- JWS Token Validation with Envoy
- Putting It All Together with Composite Authorization
- Configuring Envoy Logs Taps and Traces
- Sign / Verify HTTP Requests
Envoy’s External Authorization API
Envoy has the capability to call out to an external authorization service. There are 2 protocols supported. The authorization service can be either a RESTful API endpoint or using Envoy’s new gRPC protocol. Envoy sends all of the request details to the authorization service including the method, URI, parameters, headers, and request body. The authorization service simply needs to return 200 OK to permit the request to go through.
In this example we will be using a pre-built Open Policy Agent container that already understands Envoy’s authorization protocol.
Open Policy Agent Overview
The Open Policy Agent site describes it very succinctly
The Open Policy Agent (OPA) is an open source, general-purpose policy engine. OPA provides a declarative language that let’s you specify policy as code and APIs to offload policy decision-making from your software. OPA to enforce policies in microservices, Kubernetes, CI/CD pipelines, API gateways, or nearly any other software.
OPA focuses exclusively on making policy decisions and not on policy enforcement. OPA pairs with Envoy for policy enforcement. OPA can run as:
- A standalone service accessible via an API
- A library that can be compiled into your code
It has an extremely flexible programming model:

Additionally, the company behind OPA, Styra, offers control plane products to author policies and manage a fleet of OPA instances.
OPA decouples policy decision-making from policy enforcement. When your software needs to make policy decisions it queries OPA and supplies structured data (e.g., JSON) as input. OPA accepts arbitrary structured data as input.
OPA generates policy decisions by evaluating the query input against policies and data. OPA expresses policies in a language called Rego. OPA has exploded in popularity and has become a Cloud Native Computing Foundation incubating project. Typical use cases are deciding:
- Which users can access which resources
- Which subnets egress traffic is allowed
- Which clusters a workload can be deployed to
- Which registries binaries can be downloaded from
- Which OS capabilities a container can execute with
- The time of day the system can be accessed
Policy decisions are not limited to simple yes/no or allow/deny answers. Policies can generate any arbitrary structured data as output.
This getting started example is based on this OPA tutorial using docker-compose instead of Kubernetes.
Solution Overview
In this getting started example we take the super simple envoy environment we created in getting started episode 1 and add the simplest possible authorization rule using Open Policy Agent.
Docker Compose
This is the same docker compose file as our initial getting started example with a few modifications. At line 15 in our docker-compose file, we added a reference to our Open Policy Agent container. This is a special verison of the Open Policy Agent containers on dockerhub. This version is designed to integrate with Envoy and has an API exposed the complies with Envoy’s gRPC specification. There are also some other things to take notice of:
- Debug level logging is set on line 21
- The gRPC service for Envoy is configured on line 23
- The logs are sent to the console for a log aggregation solution to pickup (or not) on line 24

Envoy Config Changes
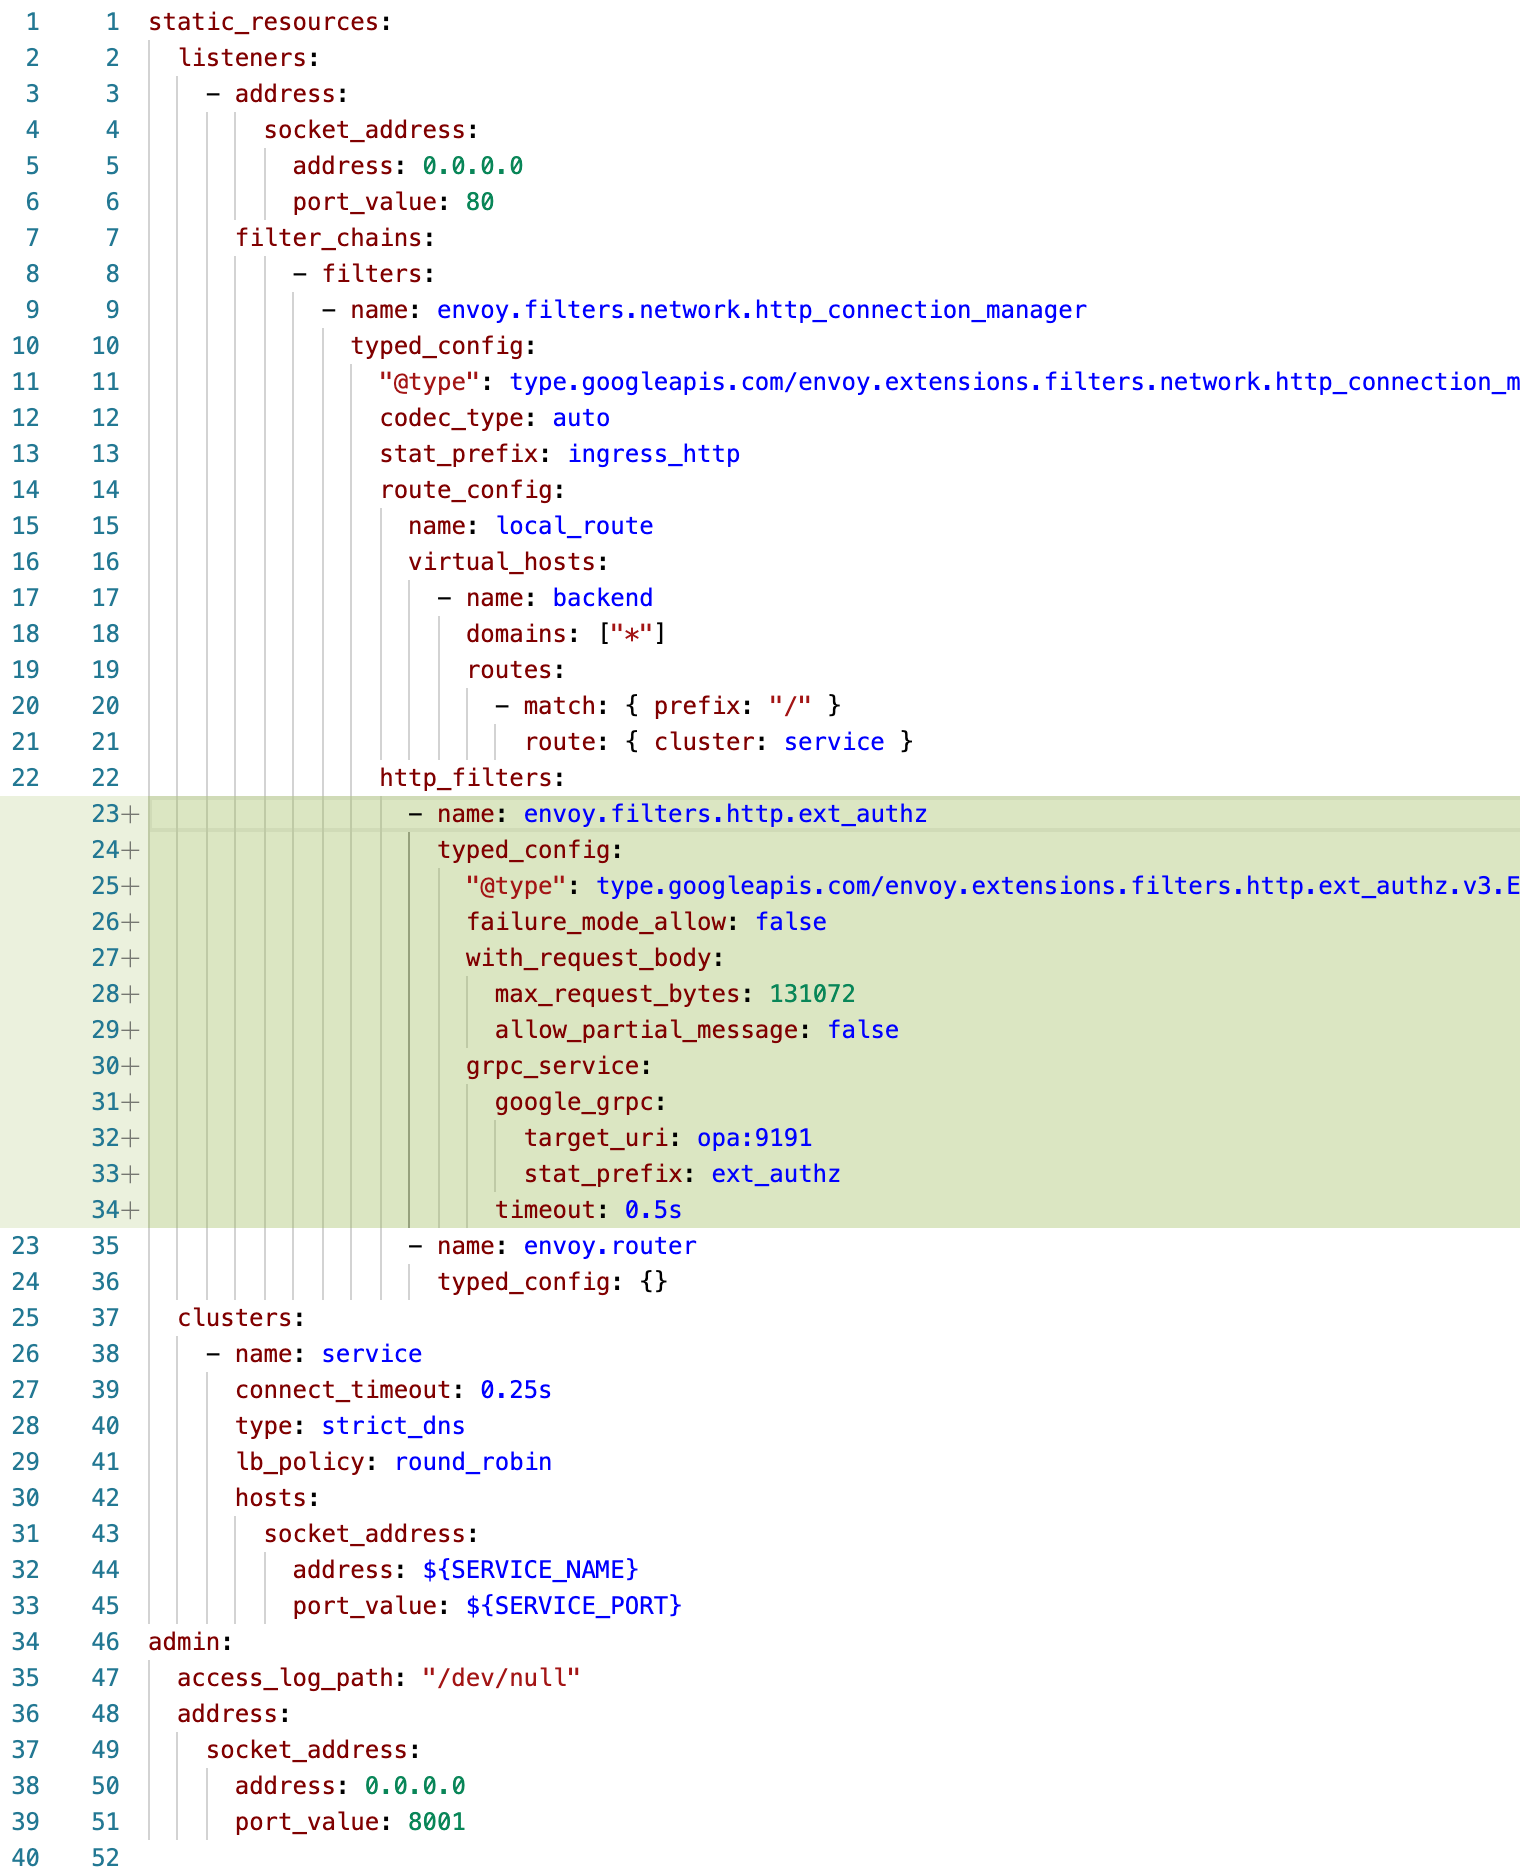
There are a few things that we need to add to the envoy configuration to enable external authorization:
- We added an external authorization configuration at line 23.
- failure_mode_allow on line 26 determines whether envoy fails open or closed when the authorization service fails.
- with_request_body determines if the request body is sent to the authorization service.
- max_request_bytes determines how large of a request body Envoy will permit.
- allow_partial_message determines if a partial body is sent or not when a buffer maximum is reached.
- The grpc_service object on line 30 specifies how to reach the Open Policy Agent endpoint to make an authorization decision.

Rego: OPA’s Policy Language
There are a lot of other examples of how to write Rego policies on other sites. This walkthrough of Rego is targeted specifically to using it to make Envoy decisions:
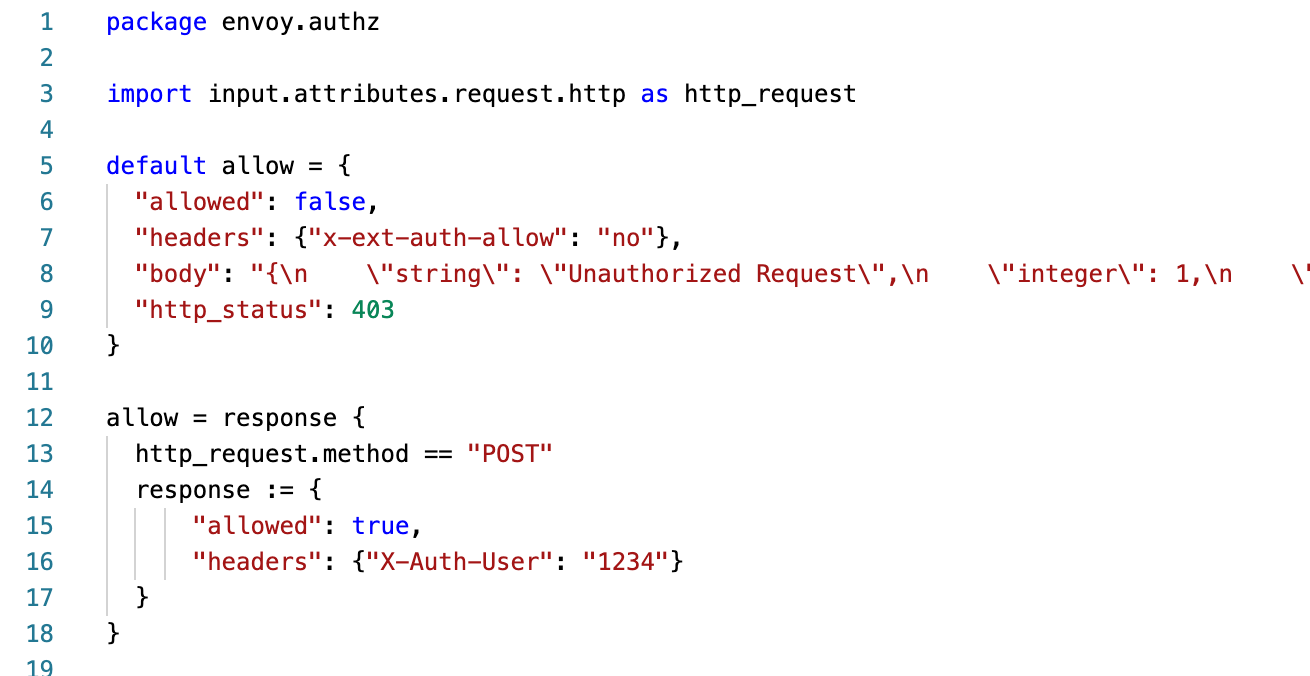
- The package statement on the first line determines where the policy is located in OPA. When a policy decision is requested, the package name is used as the prefix used to locate the named decision.
- The import statement on line 3 navigates the heavily nested data structure that Envoy sends us and gives us a shorter alias to refer to a particular section of the input.
- On line 5 we have a rule named
allowand we set it’s default value to and object that Envoy is expecting.- The allowed property determines if the request is permitted to go through or not.
- The headers property allows us to set headers on either the forwarded request (if approved) or on the rejected request (if denied). OPA does not marshal any REGO data types on your behalf. All header values must be specified as a string.
- The body property can be used to communicate error message details to the requestor. It has no affect on requests approved for forwarding. OPA does not marshal any REGO data types on your behalf. The body value must be specified as a string.
- The http_status property can be set on any rejected requests to any value as desired
- The next section starting at line 12 specifies the logic for approving the request to move forward
- On line 12 the allow rule is set to the value of the response variable that we define in the body of the rule
- Line 13 is the only condition we have defined for approval of the request. The request method simply needs to be a POST.
- If true then we set the response to the values on lines 15 and 16.

Input data sent from Envoy
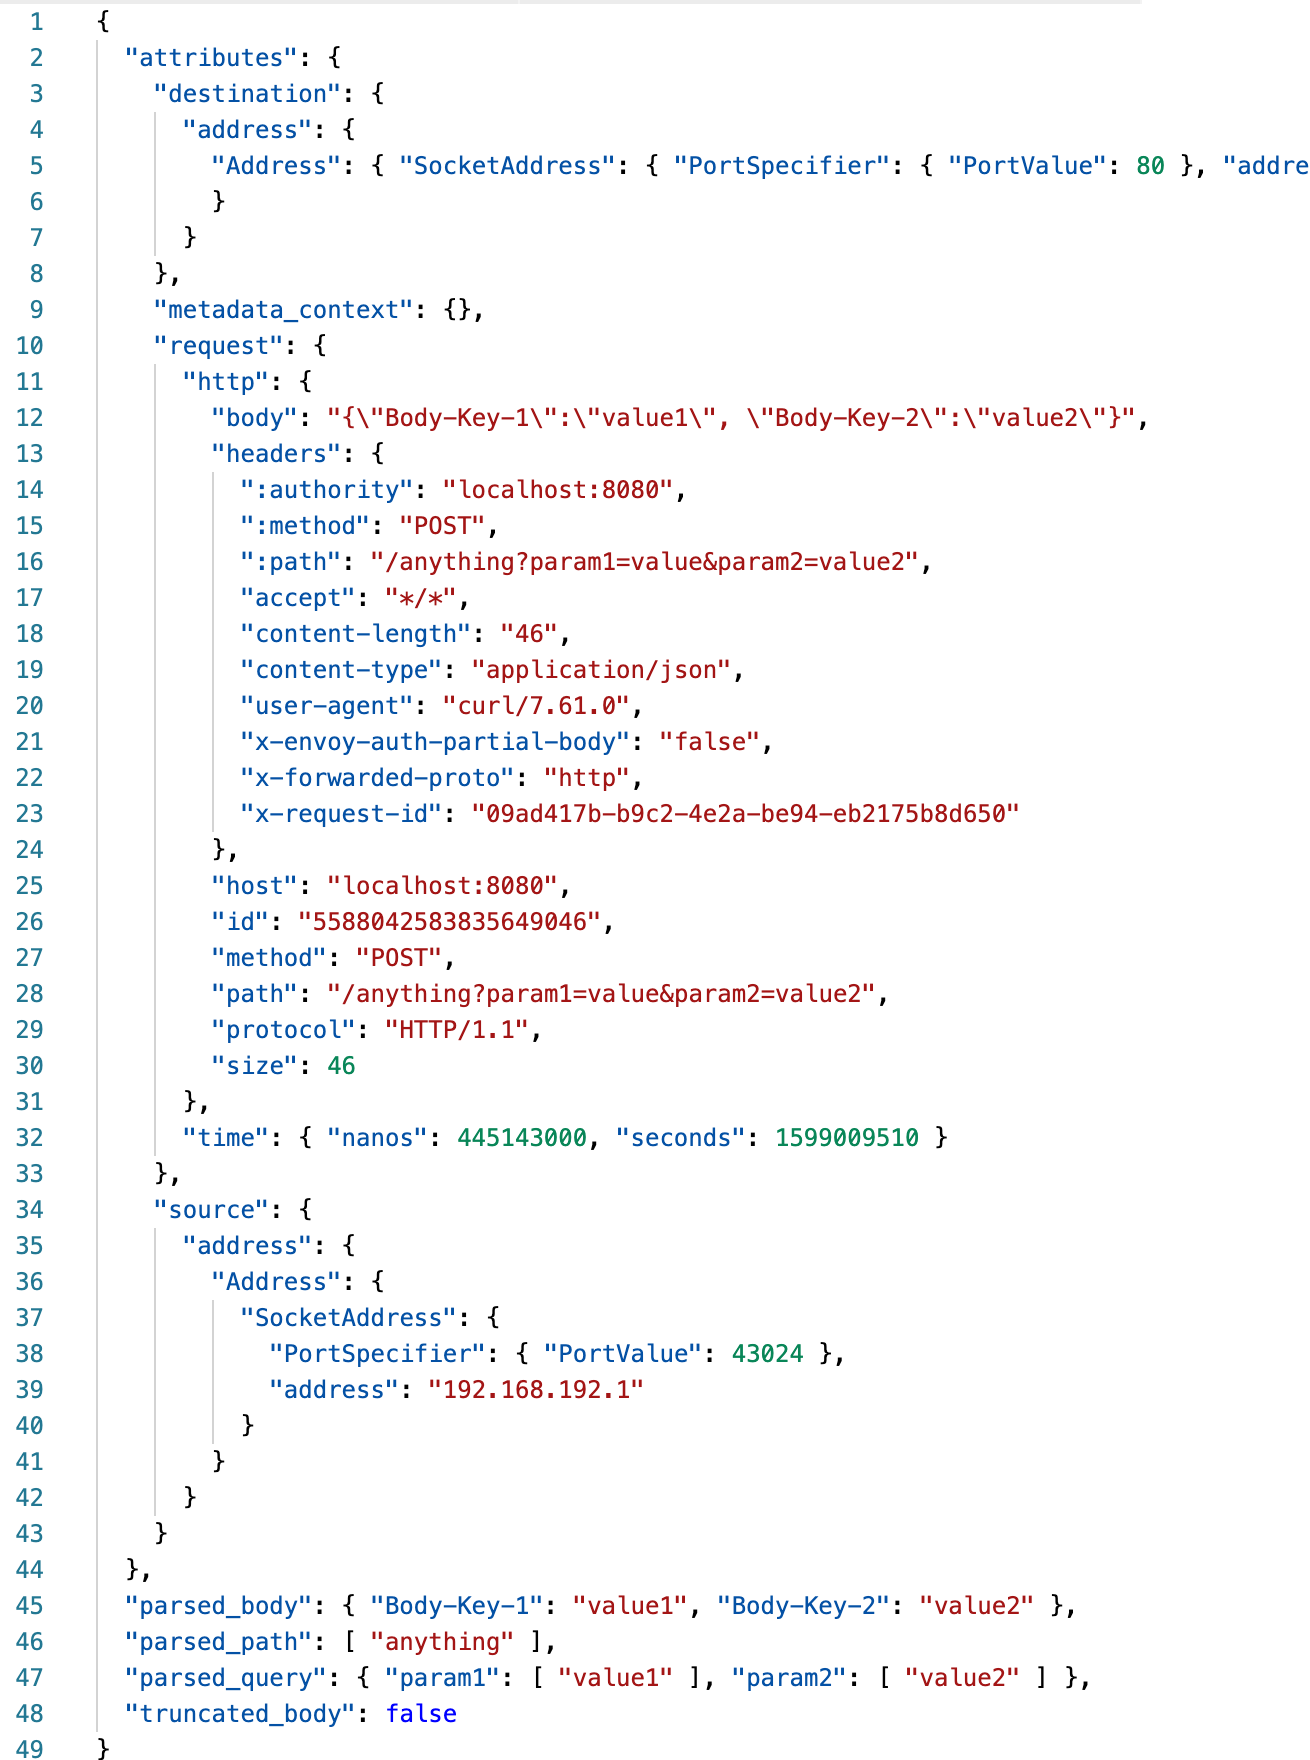
Now we dive into the details of the input data structure sent from Envoy.
- Line 3 is an object that describes the IP address and Port that the request is going to
- Line 10 is the request object itself. The unmarshalled body is present along with:
- request headers
- hostname where the original request was sent
- a unique request ID assigned by Envoy
- request method
- unparsed path
- protocol
- request size
- Line 34 is a object that describes the IP address and port where the request originated
- Line 45 is where Envoy has already done some work for us to parse the request body (if it was configured to be forwarded)
- Line 46 and 47 are the parsed path and query parameters respectively
- Finally, line 48 let’s us know whether we have the complete request body or not

Reviewing the Request Flow in Envoy’s Logs
In debug mode, we have a lot of rich information that Envoy logs for us to help us determine what may be going wrong as we develop our system.
- Line 1 shows our request first coming in
- The next several lines show us the request headers
- Line 13-14 let’s us know that envoy is buffering the request until it reaches the buffer limit that we set
- Line 16-20 show us that Envoy forwarded the request to our authorization service and got an approval to forward the request
- The remainder of the logs show envoy forwarding the request to its destination and then back to the calling client

Reviewing OPA’s Decision Log
The open policy agent decision logs include the input that we just reviewed and some other information that we can use for debugging, troubleshoot or audit logging. The interesting parts that we haven’t reviewed yet:
- The decision ID on line 2 can be matched against other OPA log entries related to this decision
- Line 5 - Envoy sends us the destination of the request
- Line 7 - Envoy sends the request details. The unmarshalled body is only available if we setup the buffering and forwarding in the Envoy configuration.
- line 30 - Envoy also sends us the source IP address that it received the request from.
- Line 37 has the labels that show which Envoy instance the request came from
- Line 42 is an object that contains the performance metrics for the decision
- Line 50 shows the response that OPA sent back to Envoy

Taking this solution for a spin
Now that we know what we are looking at, we can run this example by executing the script ./demonstrate_opa_integration.sh
- The script starts the envoy front proxy, HTTPBIN and Open Policy Agent
- Next it shows the docker container status to make sure everything is up and running.
- Curl is used to issue a request that should get approved, forwarded to HTTPBin and the display the results
- The opa decision logs are then shown to let you explore the information available for development debugging and troubleshooting
- To make sure we show both outcomes the next request should fail our simple authorization rule check.
- The decision logs are shown again
- Finally the example is brought down and cleaned up.
In the next getting started guide we will explore Open Policy Agent’s command line interface and unit testing support.


